Home » Drywall Services
Category Archives: Drywall Services
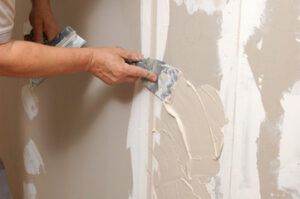
Drywall Repair Tips
Whether you have a small hole from a picture frame nail or an area of cracked drywall, you can get it looking good with a few key tools. Drywall repair requires some work and patience since the mud takes a little time to dry.
 Larger projects and ones involving structural damage require a professional Drywall Repair Las Vegas. It would be best to have a plumber to fix any leaks and a hazardous materials specialist for mold remediation.
Drywall can suffer from various issues, but one of the most common is water damage. Whether from rain, a burst pipe, or an overflowing sink, moisture damages drywall and requires immediate repair.
It is important to get water-damaged drywall repaired as soon as possible because the longer it remains wet, the more damage it will suffer from mold and mildew. In addition, a wet wall is also the perfect place for bacteria to grow. Once the water is gone, it is crucial to thoroughly dry out the area by utilizing dehumidifiers or fans.
Before beginning any repairs, it is important to remove any personal items from the affected wall and wipe it down with soap and hot water. If any areas appear to be structurally salvageable, it is recommended to use a stain blocker and recoat the wall. However, if the drywall is blistered or sagging it will need to be replaced.
For smaller holes, it is possible to simply caulk the area and paint over it. Larger holes should be sanded and filled with fiberglass mesh or a patch before spackling and sealing. In severe cases, the entire drywall sheet may need to be removed and completely replaced down to the studs.
It can take up to three days for wet drywall to completely dry out. To speed up the process, place an area fan at the affected wall and open the doors and windows to help with air circulation. Once the drywall is dry, it can be painted to match the surrounding walls.
When dealing with drywall that has been water damaged, it is best to hire a professional to handle the repair. They will be able to assess the extent of the damage and provide the right type of fix. In addition, a professional will be able to prevent the issue from reoccurring by finding the source of the problem and ensuring that it is not allowed to happen again. This will save you a lot of time and money in the long run.
Damage from Nails
Drywall is a great choice for walls because it’s cheap, easy to hang and drill into, and easy to finish and paint. But it’s not indestructible, and dents and holes appear fairly often. Damage from nails or screws, doorknobs and wall hangings and minor pest infestations can all cause dents and small holes in drywall. It’s important to fix these damage sources as soon as you notice them, since they can get worse over time and will require more time consuming repairs.
Small nail holes and shallow dents can be repaired with a simple drywall patch kit and spackle or lightweight joint compound. The kit contains a self-adhesive mesh patch that covers the damaged area, and the spackle or compound will help to fill in the hole. It’s best to apply a few thin coats of the spackle or compound to make sure it’s fully covered, and then wait the amount of time recommended by the manufacturer for the patching materials to dry.
When drywall sheets meet at outside wall corners, they’re protected by an L-shaped metal strip called a corner bead. These bead strips are nailed to the studs, and then concealed by two or three layers of drywall joint compound. Corner bead is pretty tough stuff, but it’s not indestructible, so it can be dented by vacuum cleaners, children flinging toys, or furniture that’s being moved.
One of the most common causes of dents and holes in drywall is popped nails or screws. These happen when nails are driven into a stud or wall joist that has moisture in it from the lumber that was used to build the house. The resulting water dries out and shrinks the wood, which can cause the fastener to pop out of the stud or wall.
To fix a popped nail or screw, use a utility knife to cut away loose joint compound and paper shreds around the head of the nail or screw. Drive a drywall screw into the wall stud about 1 to 2 inches above and below the popped nail or screw, being careful not to damage more drywall. Cover the screw or nail head with a light coating of spackle and allow it to dry before sanding and painting.
Damage from Cracks
When drywall begins to crack, it is time to call in a pro. This is because cracks in drywall can lead to serious household hazards. Cracks may expose the framing to moisture, causing mold or mildew to form, which can be a significant health hazard for the inhabitants of the home. In addition, if the moisture is not removed, it may cause the drywall to delaminate.
Heavy wear and tear on drywall is a common occurrence in many homes. The first signs of deterioration are blisters or bubbling paint, which is caused by moisture seeping through the cracks in the drywall and getting into the wall itself. Other indications of a problem are small cracks along corners or seams that widen over time.
Often, these blemishes can be easily repaired with spackle or drywall compound. For a professional-looking repair, use a putty knife designed for repairing drywall (rather than the kind of narrow utility knife you’d use to apply wood putty). Be sure to feather the edges so the repaired area blends in seamlessly with the rest of the wall. After a thin layer of spackle or drywall compound is applied, sand the surface until it is smooth and then paint over it.
It is also important to inspect any large holes that appear in your drywall for any electrical cords or plumbing lines that might be running through the hole. If you find a wire or pipe, be careful to avoid cutting into it until you have verified that the original builders or renovators followed all electrical and plumbing codes.
If you notice cracks in your drywall, you should take action immediately to prevent them from spreading. Most cracks are caused by moisture in the house settling, which can eventually weaken the drywall and lead to structural damage.
Most cracks in drywall can be repaired with epoxy. For larger cracks, it is necessary to use a specialized drywall patch kit. The kit contains backing boards and a patch that must be cut to the size of the crack before it can be applied.
Damage from Loose Joint Tape
While drywall seams are sealed and taped to prevent moisture intrusion, the tape itself can tear. This causes the seam to open and lets in water, which can cause mold and other problems. Unless the problem is caught quickly, it can lead to extensive and expensive repairs.
Loose tape is a common issue with drywall, especially in older homes or those where the house has been remodeled and extended. It can be caused by a number of things, including moisture intrusion, improper construction or just wear and tear. This type of damage can be fixed fairly easily by gluing the tape to the wall and then using joint compound to smooth out the surface.
To begin, remove any paint chips or drywall chunks that are loose and visible. Using a utility knife, carefully cut along the vertical edges of each section of damaged tape, making sure not to cut the corner bead or any studs below it. This will allow you to pry the loose section of tape from the wall without damaging the drywall underneath it.
Once you have removed the loose tape, apply a thin coat of joint compound to the entire section of the seam, working to ensure that it is completely smooth and covered with the compound. Once the first coat of compound has dried, sand it lightly with 150 or 180-grit sandpaper to smooth out the rough surface and blend the patch in with the rest of the area.
Now, apply a second coat of joint compound to the patch. This time, apply it slightly thicker than the first, and use your putty knife to smooth out any bubbles or air pockets that may have formed. After the second coat has dried, sand it once again with the sandpaper to smooth out the rough patch and again blend it into the surrounding area.
Now, when you are done sanding, it is time to paint. Be sure to let the sanded patch fully dry before painting, and be sure to use a high-quality primer as well. This will help to extend the life of your drywall repair.